To install or upgrade to Windows 11, the Media Creation Tool provides a simple method for creating installation media. This tool allows you to make a bootable USB drive or download an ISO file for your PC. In this guide, you'll find clear instructions for downloading the tool, creating your installation media, and troubleshooting common issues that may arise during the process.
How do I download the Media Creation Tool?
Before you begin, ensure your PC meets the minimum requirements for Windows 11. You’ll need a compatible PC and a stable internet connection. Here’s how to download the tool safely:
- Open your web browser and go to the official Microsoft Windows 11 download page.
- Look for the section labeled "Create Windows 11 Installation Media."
- Click the button that says "Download now" to start downloading the Media Creation Tool.
- Once the download is complete, locate the
MediaCreationTool.exefile in your downloads folder and double-click it to run the tool.
What are the steps to create installation media?
Creating installation media is straightforward. Follow these steps:
- After launching the Media Creation Tool, accept the license terms when prompted.
- Choose the option "Create installation media (USB flash drive, DVD, or ISO file) for another PC" and click "Next."
- Select your preferred language, edition, and architecture (32-bit or 64-bit) for Windows 11, then click "Next."
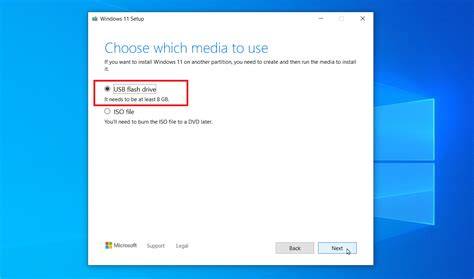
- Choose whether you want to create a USB flash drive or an ISO file. If you select USB, make sure it's plugged in and has at least 8 GB of space.
- If you chose USB flash drive, select it from the list and click "Next." If you selected ISO file, choose the location to save the file and click "Next."
- The tool will download Windows 11 and create the media. This may take some time depending on your internet speed and system performance.
What if the tool fails to run or create media?
You might encounter issues while using the Media Creation Tool. Here are some common problems and their solutions:
- Error Code 0x80042405: This relates to USB device issues. Try using a different USB drive or port.
- Insufficient Space: Ensure your USB drive has enough space (at least 8 GB) and is formatted correctly.
- Tool Crashes: If the tool crashes, restart your PC and try running it again. If it still doesn't work, consider disabling any antivirus software temporarily.
- Network Issues: A stable internet connection is necessary. If you're having trouble downloading, check your connection and try again.
How do I verify that the installation media works?
After creating your installation media, it’s wise to verify that it works correctly:
- If you created a USB flash drive, plug it into a computer and restart the device. Access the BIOS or boot menu (usually by pressing F2, F12, or Delete) and ensure it recognizes the USB drive as a boot option.
- If you created an ISO file, you can use software like Rufus to test it without burning it to a USB drive. Open Rufus, select the ISO file, and see if it recognizes it correctly.
- If everything seems fine, your media should be ready for installation.
What should I do if I encounter other issues?
If you run into other problems while using the Media Creation Tool, consider these FAQs:
- What if I don't have a USB drive? You can create an ISO file instead and burn it to a DVD if you prefer that method.
- Can I use this tool on Windows 10? Yes, the Media Creation Tool can be used to upgrade from Windows 10 to Windows 11.
- How do I find out if my PC is compatible with Windows 11? Microsoft provides a PC Health Check tool that you can download and run to check compatibility.
Conclusion
After creating and verifying your installation media, you're ready to install or upgrade to Windows 11. Follow the on-screen instructions during installation, and back up your data to prevent any loss. This process should provide a smooth transition to your new operating system.