If you're struggling with persistent errors in Windows 11, the built-in troubleshooting tools can help you quickly identify and fix common problems. These tools are crafted to tackle issues such as network connectivity, audio playback, and more. By following this guide, you'll learn how to access and use these tools effectively to get your system back on track.
What are the built-in troubleshooting tools in Windows 11?
Windows 11 offers several built-in troubleshooting tools to help resolve various issues. Key tools include:
- Internet Connections Troubleshooter: Diagnoses and resolves internet connectivity problems.
- Playing Audio Troubleshooter: Identifies and fixes sound playback issues.
- Hardware and Devices Troubleshooter: Checks for problems with connected devices like printers and external drives.
- Windows Update Troubleshooter: Assists in diagnosing and resolving common issues with Windows updates.
How to access the troubleshooting tools?
To access the built-in troubleshooting tools in Windows 11, follow these steps:
- Click on the Start button or press the Windows key.
- Select Settings from the menu.
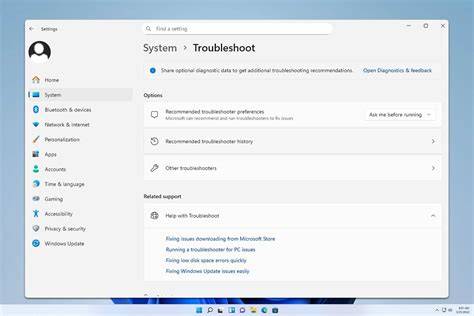
- In the Settings window, click on System.
- Scroll down and select Troubleshoot.
- Click on Other troubleshooters to view and run specific troubleshooters.
Which common issues can these tools fix?
These troubleshooting tools can address a range of common issues, including:
- Network connectivity problems: Issues with Wi-Fi or Ethernet connections.
- Audio problems: Sound not working or audio devices not recognized.
- Display issues: Problems with screen resolution or brightness settings.
- Update failures: Troubles with Windows updates not installing correctly.
How to run a specific troubleshooter?
To run the Internet Connections troubleshooter, which helps resolve network issues, follow these steps:
- Go to Settings by clicking the Start button and selecting it.
- Click on System.
- Select Troubleshoot.
- Click on Other troubleshooters.
- Find the Internet Connections option and click the Run button next to it.
The troubleshooter will analyze your network settings. Follow the prompts to see if it identifies and resolves any issues.
What to do if troubleshooting doesn't work?
If the built-in troubleshooting tools do not resolve your issue, consider these next steps:
- Check for Windows updates: The latest updates can often fix underlying issues.
- Restart your computer: A simple restart can resolve many temporary problems.
- Seek further support: Visit Microsoft’s support website or community forums for additional help.
- Explore advanced solutions: If you're comfortable, look into device drivers, system restore, or consider reinstalling Windows as last resorts.
Conclusion
If you still encounter issues after using the troubleshooting tools, exploring other support options or advanced troubleshooting methods may be necessary. Keeping your system updated and regularly checking for problems can help prevent future complications.
Frequently Asked Questions
What versions of Windows does this apply to?
These troubleshooting tools are specific to Windows 11 and applicable to all versions of Windows 11.
Do I need Administrator privileges to use these tools?
No, Administrator privileges are not required to access and run the built-in troubleshooting tools.
What should I do if I get an error message while troubleshooting?
If you encounter an error message, note the exact wording of the message and refer to Microsoft’s support site for guidance specific to that error.